 When I was about eight years old an odd craze swept through my primary school. The jewellery-made-from-crisp-packets craze.
Do you remember it?
It must have been about the late 1980s and it was suddenly de rigeur to put a crisp packet into the oven, watch it shrink and then stick a safety pin on the back and wear it as a badge. I know, easily pleased hey?
I was vaguely aware at the time that there was a more sophisticated version of the crisp packet badge. A version that involved painting your own designs onto some special plastic and then shrinking it down to size.
I’m not sure that we ever reached these levels of sophistication in my family, content instead with pledging our allegiance to some deeply unhealthy salty snack.
But, 25 or so years later, I finally tried it out.

I’ve noticed some really amazing shrink plastic jewellery recently. I first saw this absolutely stunning Squirrel Nutkin necklace about a year ago, by the Savvy Crafter. I pinned it (of course) but never thought I’d ever be able to make something similar myself, due to my complete and utter lack of ability to draw anything.
Then, a few weeks ago, I spotted these bird earrings by Dream a Little Bigger. And, guess what, she’d made them out of a vintage picture, simply printed out of her computer! Bingo. This was more up my alley. No need to attempt to draw something and – even better – another excuse to get the vintage images out.
I read up on a few tutorials, which all made it sound super simple, so decided to make myself a lobster necklace and some teapot earrings, with some retro images I found on the Graphics Fairy. (This lobster and this teapot…)
The initial stages are, indeed, super simple.
All you need is a printer, an oven, some scissors, a nice image and some ink jet shrink plastic (I bought mine from eBay, of course). Shrink plastic comes in various different types, but if you want to use a printed image, make sure you get an ink jet one. Then you can choose clear, white or frosted, depending on what look takes your fancy.
Then you draw or print your image onto the plastic at about double the size you want it to end up.

Cut round the shape, add any holes you might want with a hole punch (for hanging earring clasps or whatever) and pop it into the oven.
And this was when I found it all started to get a bit more complicated than I expected…

All the instructions I read said that it would take two to three minutes (I read the lines “shrink in front of your eyes” a fair few times…)
Ready for this amazement, I put it into the oven and watched. And watched. And watched.
After 15 minutes nothing had happened, so I turned the oven up. And watched a bit longer.
In the end, I found that pieces of the size I was making took about 20 minutes to shrink completely down, when the oven was on at 200 degrees. Maybe my oven’s a bit crap. Who knows?
The instructions on my shrink plastic (and on the other blogs I read) all said that you’ll know it’s done when the plastic has curled up and then flattened back out again.
The thing is, it never completely flattens back out. Well, it didn’t for me. It curls up, like one of those fortune telling fish, then returns to a sort of flat position…
I tried to make them dry fully flat by putting them under something heavy while they cooled, but it didn’t make much difference.
Still, at the end of it all, I had some diddy little shrunk pieces of plastic!
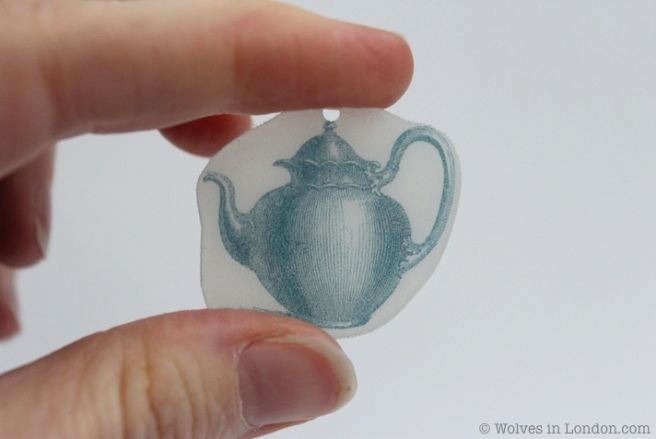
Now, as I said, I was planning on making the teapots into earrings, but when I tried them out with an earring hoop on the top I thought they looked, well, pretty stupid and amateur.
It could be because I hadn’t cut them into a proper circle. (Why not? I don’t know.)
But even if they were perfectly circularly symmetrical, I’m still not sure that I would have produced something I wanted to wear in my ears.
(Before I started this, I was imagining producing some cutting edge jewellery to give Tatty Devine a run for their money. What I made, instead, would look a bit too rubbish to be stocked in Claire’s Accessories…)
I still thought they were kind of sweet though and was scratching my head, wondering what else I could turn them into, when it suddenly dawned on me: gift tags.
These would be just perfect tied onto a bit of ribbon, to wrap a present with.
And, take a look, I wasn’t wrong:


Not a complete waste of time, then, but not quite the work of genius I’d originally imagined.
And now for the lobster. This is he:

At first, I thought this was as much of a failure as the teapots, but I put it onto a necklace anyway, just to see.
And, well, I think I sort of love it!

What do you reckon? Is my judgment (along with my eyes) just blinded by the hours I put in, sitting in front of a hot oven, or is this something that I might actually wear when leaving the house?
Related articles:
- Do you recognise the teapot? It’s the same one I used to make my first ever fabric.
- And there are a whole lot more posts related to vintage images if you want to take a look.
- Or, check out my tutorials page for more things to make.
I’m really pleased that this project was featured at Serenity Now:


In the US we called this stuff Shrinky Dinks. I used to use it unshrunk to make patterns for pieced quilts because you could see the fabric through it and it lasted. I never use crisps packets… Is that potato chips here?
Yes, potato chips. There was one particular brand – Skips – that worked very well as a badge I remember. I guess they were delighted to find that children were giving them free advertising by wearing their packets as badges!
On the right side of the lobster you have a sharp edge…if you can still round that off a little you will have a very nice piece- not at all junky.
Thanks Nancy! You know, I hadn’t even noticed that sharp edge, ha ha. I’m going to try and file it back with a nail file right now…
Love, love, love! I especially love the little lurid lobster 🙂
Oh thanks for the memory … my cousins and I crouching around my Grannys Rayburn shrinking crisp packets for badges … my, we were easily pleased … love the lobster and the little teapots are cute … Bee x
It was the height of excitement wasn’t it?! I still have that Skips badge somewhere, that’s how much I loved and treasured it. (It got a place in my Snoopy tin with all my most precious possessions…)
Oh my goodness – I totally remember Shrinky Dinks or at least the commercials! Love your lobster necklace. Adorable and nautical is some in right now. Coming over from the Graphics Fairy and so gladI did!
Jeanine
What a fantastic way to use those images. I absolutely love that lobster necklace. Genius!
LOVE LOVE LOVE the lobster necklace. I want one too …. maybe June …
Aaah, thanks for the memory! I remember shrinking crisp packets under the grill while my mum was out. I think that’s why I love playing with shrink plastic so much now.
I had a similar problem with large pieces of inkjet shrink plastic not flattening out. Mine started to melt before it flattened, so I don’t know if it’s just more suited to small pieces…
I’m not great at drawing, but the frosted variety is great for tracing over images with Sharpies or pencil crayons, or permanent inks with large rubber stamps works well.
Thanks for sharing!
Oh these are great tips, I love the idea of tracing straight onto the shrink plastic itself. I’ve seen some really amazing pieces around the place, but always thought my drawing skills just wouldn’t be up to it!
I love the idea of using vintage images, that lobster necklace is so cool! I teach art to young kids and we use shrink plastic all of the time, I’ve found that they shrink must faster at a higher temp. Crank up your oven a bit more. Also if you have a small toaster oven, they shrink even faster!!
Well I think he looks great! 😀
Thanks for sharing at #Pintorials
I can’t say I’ve ever heard of shrinking crisp packets to make badges but I do love Shrinky Dinks. My son had some in his party favour bag from his friend’s birthday when he was younger and he was amazed watching the pictures shrink after he’d coloured them in 🙂
Hi…Thanks so much for trying this out. It’s one of those projects in the back of my mind that I always would like to get to but never do kind of thing; I have an issue with ADD when it comes time to projects as you can tell by my Etsy store grafxquest.etsy.com. I came over from the graphicsfairy of course and really was excited to see your project. I did these when I was a kid back in the 70’s and now thanks to you I may have an idea for something I have been trying to figure out for over a year! So thank you so much again for bringing this to our attention!
I found you through The Graphics Fairy – love your post and necklace! Thank you for sharing your explorations. I want to do this, too.
I too remember doing the crisp badge thing! & did anybody make plaster of paris bottle badges from liqueur chocolate plastc trays?!
I love this idea & will probably have a go myself, thanks.
Amazing! Can you tell us, which material you used exactly? I tried some materials but yours looks georgeous!
Thank you for your help!